
Hi. Today I will show you how you can install the GitLab server within an hour and run your first CI/CD process in it.
This article is part of a series on how to get started with the popular CI/CD tools. In this article, I will show you how to install the CI/CD tool and how to prepare the process of building and testing a simple project based on Maven.
What is GitLab?
Gitlab is a tool supporting software development using the Continuous Integration and Continuous Delivery processes. Its main component is the Git version control system. In addition, it provides many functions that support the work of programmers in the continuous building, testing and automatic installation of projects for various environments.
What is Docker Compose?
To find out what Docker Compose is, go to the article: How to install Jenkins using Docker Compose?
Tools required
Before starting work, prepare the required tools. You can find a description of these tools on the website: How to install Jenkins using Docker Compose?
Configuration for Docker Compose
We will start work on the installation by creating a dedicated directory in which we will store data and Gitlab configuration.
> mkdir gitlabFor convenience, we will also set an environment variable that will contain the path to our Gitlab directory:
> export GITLAB_HOME=$(pwd)/gitlabIn the next step, we create the docker-compose.yml file with the following content:
# docker-compose.yml
version: '3.7'
services:
  web:
    image: 'gitlab/gitlab-ce:latest'
    restart: always
    hostname: 'localhost'
    container_name: gitlab-ce
    environment:
      GITLAB_OMNIBUS_CONFIG: |
        external_url 'http://localhost'
    ports:
      - '8080:80'
      - '8443:443'
    volumes:
      - '$GITLAB_HOME/config:/etc/gitlab'
      - '$GITLAB_HOME/logs:/var/log/gitlab'
      - '$GITLAB_HOME/data:/var/opt/gitlab'
    networks:
      - gitlab
  gitlab-runner:
    image: gitlab/gitlab-runner:alpine
    container_name: gitlab-runner
    restart: always
    depends_on:
      - web
    volumes:
      - /var/run/docker.sock:/var/run/docker.sock
      - '$GITLAB_HOME/gitlab-runner:/etc/gitlab-runner'
    networks:
      - gitlab

networks:
  gitlab:
    name: gitlab-network
This configuration defines what containers we want to run. In our case, it will be the GitLab service with one GitLab runner (a separate module for running CI / CD tasks). The most important configuration parameters are:
- image – docker image that we want to use in our server
- ports – a list of ports that we make available outside the container. In our configuration, we provide ports 80, 443 (website)
- container_name – the name of our container
- volumes – specifies the volumes that are used by the container. In our configuration, we have directories shared with our system (subdirectories in $ GITLAB_HOME) and an additional volume that allows access to the Docker environment from the GitLab runner.
- networks – defines the virtual network in which the containers will operate. In our case, the www portal and the runner operate in one “gitlab-network”
Gitlab installation
Containers are started using the command:
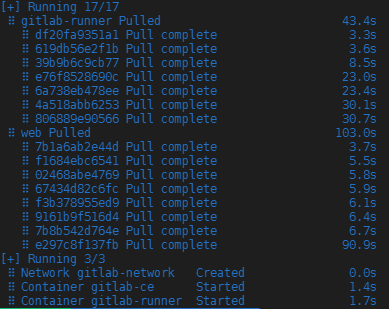
> docker-compose up -dOnce launched, Docker will download GitLab and GitLab Runner images from the servers. On my computer it looked like this:
To log in to GitLab for the first time, you need a temporary password, which is generated automatically during installation. We get the password using the command:
> docker exec -it gitlab-ce grep 'Password:' /etc/gitlab/initial_root_passwordGitLab launching
Our GitLab is available at: http://localhost:8080. After going to this address, the following screen should appear:

Note: The first launch of the portal may take several minutes.
To log in to the portal, we must enter the “root” in Username field and the temporary password that we obtained earlier in the Password field.
After logging in, the following screen should appear:

Congratulations, GitLab has been successfully launched!
Initial configuration of the portal
Before we proceed, it is worth changing a few portal settings. First, we’ll turn off open registration for everyone. To do this, click the View Setting button available on the upper bar with a warning (address to the panel; http://localhost:8080/admin/application_settings/general#js-signup-settings ). On the new page, uncheck Sign-up enabled and save the changes.

The next step should be to change the root user. To do this, go to the website: http://localhost:8080/-/profile/account and enter the name in the Change username field. We approve by clicking on Update username.

The last change we will make is to change the password. To do this, go to the page: ost:8080/-/profile/password/edit and enter a temporary password and a new password. We approve the change by clicking Save password.
GitLab runner configuration
To use the GitLab runner in GitLab, you need to configure it. For correct configuration, we will need a token copied from the portal. To do this, go to the address: http://localhost:8080/admin/runners and click the Copy token button.

In the next step, it goes to the console and run the following command:
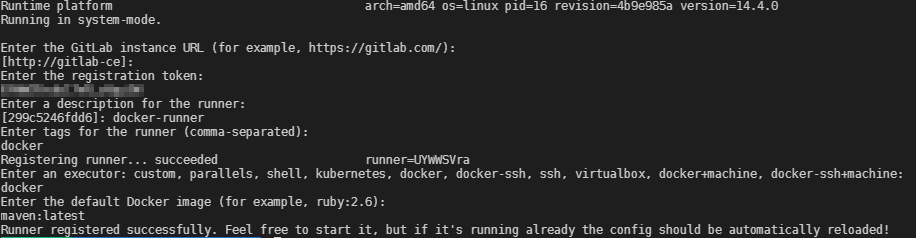
> docker exec -it gitlab-runner gitlab-runner register --url "http://gitlab-ce" --clone-url "http://gitlab-ce"After launching, a configuration module will appear. The module provides the following information:
- Enter the GitLab instance URL: confirm the entered value (click enter)
- Enter the registration token: enter the token copied before.
- Enter a description for the runner: enter the name of the runner, e.g. docker-runner
- Enter tags for the runner: leave the field blank here
- Enter an executor: enter docker here
- Enter the default Docker image: here we provide the default docker image, e.g. maven: latest
After proper configuration, we should see confirmation Runner registred successfully:
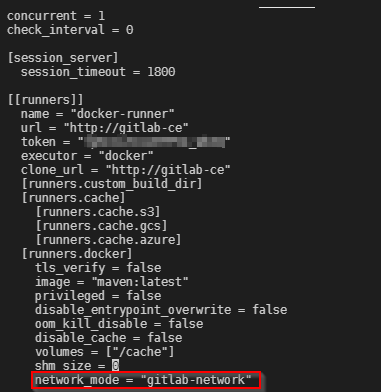
In addition to the basic configuration, we also need to allow access for containers launched from the runner to the virtual network in which GitLab operates. To do this, we run the editor (e.g. vi)
> sudo vi gitlab/gitlab-runner/config.tomlThen we add new line to the end of the runner configuration: network_mode = “gitlab-network”
To check if the runner is available from the GitLab level, go to the following address:http://localhost:8080/admin/runners

We create our first repository
After setting up the runner, we can create our first repository. To do this, go to the page: http://localhost:8080/projects/new and click Import project.

Na następnym ekranie wybieramy Import project from: Repo from URL. Następnie podajemy w Git repository URL adress: https://github.com/czerniga/helloworld.git. Na końcu zatwierdzamy klikając Create project.
On the next screen, select Import project from: Repo from URL. Then we provide the Git repository URL address: https://github.com/czerniga/helloworld.git. Finally, confirm by clicking Create project.

After a while you should have the first repository copied to your GitLab.

We create the CI/CD pipeline
To create a CI/CD pipeline for the project, click the main menu on the left, CI/CD, and then Editor. An option to create a .gitlab-ci.yml file, which will contain our pipeline definitions, will appear on the screen. This file will be created in the Git repository.

On the new screen we can see our pipeline editor. In the editor, paste the following content:
image: maven:latest

stages:
  - build
  - test

build-job:
  stage: build
  script:
    - echo "Compiling the code..."
    - mvn clean package
    - echo "Compile complete."
  artifacts:
    paths:
    - target

test-job:
  stage: test
  dependencies:
    - build-job
  script:
    - ls -al
    - echo "Running tests"
    - java -cp target/helloworld-1.1.jar com.coveros.demo.helloworld.HelloWorld
The above definition describes how the CI / CD process should work. The most important elements are:
- image: docker image that we will use to build our project
- stages: a list of our process steps
- build-job: the first step in our process to build our project. Additionally, we save the artifacts for use in the next step
- test-job: the second step to run our project
After pasting our file, confirm the changes by clicking Commit changes.

Once approved, GitLab will launch the process. To check its results, go to CI/CD -> Pipelines in the menu on the left. On the screen we should see that our first task has already been started.

We can go to the details of this task by clicking on the pending button or the build number #1
After a while, the task should be built and tested.

Congratulations, you have just created your first CI/CD job in GitLab!
Stopping the container
The containers containing our service were launched with the switch causing the work in the background. If you want to stop the portal, execute this command:
docker-compose downSummary
In this tutorial, I showed how you can run GitLab with one GitLab runner. The configuration given here causes that all website data is saved in the directory on your computer / server. For this reason, the data will not be deleted when the containers are stopped or removed.
Dear Patrycjusz Czerniga
This is very useful article, thanks for sharing
If you are planning to update this further, I would recommend adding Gitlab-docker registry and NGINX reverse proxy to make it a complete suite
Thanks & Regards
Mahesh
this is amazing, I’ve been looking for a long time how to do it, thank you so much!
I consult you and I hope you can help me, when I run some job is giving me the following error:
fatal: unable to access ‘http://gitlab-ce/gitlab-instance-bd6478cd/Monitoring.git/’: Could not resolve host: gitlab-ce
could you tell me how to fix it?
Please double check if you gitlab-runner is in gitlab network and if you add new line to the end of the runner configuration: network_mode = “gitlab-network”.
Hi, patrycjusz
Thank You so much
cool & perfect.
Awesome post, thanks for detailing the process.
There’s a typo in the following paragraph:
GitLab launching
Our GitLab is available at: http: //localhost:8080
(space after http:)
You’re right, thanks for pointing it out!
Thank you very much. Just one caveat for those who try:
Be careful if you copy&paste
network_mode = “gitlab-network”
quotation marks can be tricky on Vim editor
Thank you its amazing and very helpful!
there are some steps which are manual like copy the token for gitlab runner and create repo. is there any way to configure the token thing in the compose automatically ?
You can define token in docker-compose.yml file. You can find an example here: https://forum.gitlab.com/t/example-gitlab-runner-docker-compose-configuration/67344
docker exec -it gitlab-ce grep ‘Password:’ /etc/gitlab/initial_root_password
is not working. it says
grep: /etc/gitlab/initial_root_password: No such file or directory
Great job ! step by step
docker exec -it gitlab-ce /bin/bash
vi /etc/gitlab/initial_root_password
Nice and clean explanations thank you !
This blog is great! I have been going through the steps and all good except this error.
Uploading artifacts…
1951target: found 19 matching artifact files and directories
1952WARNING: Uploading artifacts as “archive” to coordinator… POST http://gitlab-ce/api/v4/jobs/7/artifacts: 500 Internal Server Error id=7 responseStatus=500 Internal Server Error status=500 token=64_p_rXJ
I ran gitlab-runner –debug run and the logs said.
“missing /usr/bin/gitlab-runner-helper. uploading artifacts is disabled.”
And I searched gitlab-runner docker and found that there is no gitlab-runner-helper. So am I missing anything??
Thanks,
MJ
Ah.. I figured that.. the second log is misleading. The recent bug issued says any “DEBUG” variable occurs “Missing gitlab-runner-helper” message since I ran gitlab-runner with –debug.
So the root cause is this and looks like accepted upload-interval is 3s but the actual duration is 7s. Am I interpreting it correctly??
2023-05-06 10:25:25 WARNING: Job failed: exit code 1
2023-05-06 10:25:25 duration_s=7.7324798999999995 job=8 project=2 runner=TtNqdC-C
2023-05-06 10:25:25 Appending trace to coordinator…ok code=202 job=8 job-log=0-2299 job-status=running runner=TtNqdC-C sent-log=1130-2298 status=202 Accepted update-interval=3s
Thanks,
MJ
Thank you very much for this helpful post, really appreciated
in the pipeline editor example… if you add tags to the gitlab runner ( docker ) you have to add this tag for the projets too.
example:
stages:
– build
– test
build-job:
stage: build
script:
– echo “Building the project…”
tags:
– docker
test-job:
stage: test
script:
– echo “Running tests…”
tags:
– docker
whitout the docker tags the job can’t runing.
Great post! I found the step-by-step instructions super helpful. The Docker Compose approach made the installation process so much easier. Thanks for sharing!